Buckets:


| # Ml-For-3D-Course | |
| ## Docs | |
| - [What is it?](https://huggingface.co/learn/ml-for-3d-course/unit2/what-is-it.md) | |
| - [Setup](https://huggingface.co/learn/ml-for-3d-course/unit2/setup.md) | |
| - [Bonus](https://huggingface.co/learn/ml-for-3d-course/unit2/bonus.md) | |
| - [Introduction](https://huggingface.co/learn/ml-for-3d-course/unit2/introduction.md) | |
| - [Hands-on (Part 1)](https://huggingface.co/learn/ml-for-3d-course/unit2/hands-on-1.md) | |
| - [Pipeline](https://huggingface.co/learn/ml-for-3d-course/unit2/pipeline.md) | |
| - [Hands-on (Part 2)](https://huggingface.co/learn/ml-for-3d-course/unit2/hands-on-2.md) | |
| - [Hands-on](https://huggingface.co/learn/ml-for-3d-course/unit3/hands-on.md) | |
| - [What is it?](https://huggingface.co/learn/ml-for-3d-course/unit3/what-is-it.md) | |
| - [Bonus](https://huggingface.co/learn/ml-for-3d-course/unit3/bonus.md) | |
| - [Introduction](https://huggingface.co/learn/ml-for-3d-course/unit3/introduction.md) | |
| - [Hands-on](https://huggingface.co/learn/ml-for-3d-course/unit4/hands-on.md) | |
| - [Marching Cubes](https://huggingface.co/learn/ml-for-3d-course/unit4/marching-cubes.md) | |
| - [Introduction](https://huggingface.co/learn/ml-for-3d-course/unit4/introduction.md) | |
| - [Mesh Generation](https://huggingface.co/learn/ml-for-3d-course/unit4/mesh-generation.md) | |
| - [Run locally](https://huggingface.co/learn/ml-for-3d-course/unit5/run-locally.md) | |
| - [Walkthrough](https://huggingface.co/learn/ml-for-3d-course/unit5/walkthrough.md) | |
| - [Run in notebook](https://huggingface.co/learn/ml-for-3d-course/unit5/run-in-notebook.md) | |
| - [Introduction](https://huggingface.co/learn/ml-for-3d-course/unit5/introduction.md) | |
| - [Run via API](https://huggingface.co/learn/ml-for-3d-course/unit5/run-via-api.md) | |
| - [Conclusion](https://huggingface.co/learn/ml-for-3d-course/conclusion/conclusion.md) | |
| - [Non-meshes](https://huggingface.co/learn/ml-for-3d-course/unit1/non-meshes.md) | |
| - [Generative 3D pipelines](https://huggingface.co/learn/ml-for-3d-course/unit1/pipelines.md) | |
| - [Introduction](https://huggingface.co/learn/ml-for-3d-course/unit1/introduction.md) | |
| - [Meshes](https://huggingface.co/learn/ml-for-3d-course/unit1/meshes.md) | |
| - [What's going on?](https://huggingface.co/learn/ml-for-3d-course/unit0/whats-going-on.md) | |
| - [Welcome to the 🤗 Machine Learning for 3D Course [[introduction]]](https://huggingface.co/learn/ml-for-3d-course/unit0/introduction.md) | |
| - [How to do it yourself](https://huggingface.co/learn/ml-for-3d-course/unit0/how-to-do-it-yourself.md) | |
| - [Why does it matter?](https://huggingface.co/learn/ml-for-3d-course/unit0/why-does-it-matter.md) | |
| ### What is it? | |
| https://huggingface.co/learn/ml-for-3d-course/unit2/what-is-it.md | |
| # What is it? | |
| Multi-view diffusion is a type of diffusion model (e.g. [Stable Diffusion](https://huggingface.co/blog/stable_diffusion)). However, instead of being trained on regular images, it's trained on multiple views of an object from different perspectives. | |
|  | |
| ## Problems | |
| Multi-view diffusion is useful for 3D. | |
| However, it doesn't work out-of-the-box. It tends to suffer from something called the Janus problem, where objects have multiple faces (or, more generally, lack of consistency across views). | |
|  | |
| ## Solutions | |
| State-of-the-art multi-view-diffusion models like [MVDream](https://huggingface.co/MVDream/MVDream) address this problem using specialized techniques. | |
| I won't be going into technical detail on multi-view diffusion in this course, since it's more related to diffusion than to 3D, but if you'd like to learn more, check out the [Diffusion course](https://huggingface.co/learn/diffusion-course/unit0/1). | |
| In the next sections, we'll be using a pre-trained multi-view diffusion model to generate multi-view images. | |
| ### Setup | |
| https://huggingface.co/learn/ml-for-3d-course/unit2/setup.md | |
| # Setup | |
| [](https://githubtocolab.com/dylanebert/ml-for-3d-course-notebooks/blob/main/multi_view_diffusion.ipynb) | |
| Click the link above to open a Colab notebook with the code for this unit. | |
| ## Runtime | |
| Multi-view diffusion, as well as other units in this course, require GPU. | |
| In the notebook, click `Runtime` -> `Change runtime type` and select `GPU` as the hardware accelerator. | |
|  | |
| Alternatively, you can run the notebook on your local machine if you have a GPU. | |
| ## Prerequisities | |
| To run any code block in the notebook, click the `Play` button on the left side of the block. | |
| We'll start by installing all necessary dependencies: | |
| `pip install -r https://huggingface.co/spaces/dylanebert/multi-view-diffusion/raw/main/requirements.txt` | |
| If the notebook asks you to restart the session, do so, then rerun the code block. You should see a green checkmark next to the code block if everything is installed correctly. | |
| ### Bonus | |
| https://huggingface.co/learn/ml-for-3d-course/unit2/bonus.md | |
| # Bonus | |
| This unit used multi-view diffusion as an example to get familiar with the model ecosystem at a high level. | |
| However, multi-view diffusion is just one of many available models used in generative 3D tasks. | |
| Due to the rapid pace of progress in generative 3D, I want to emphasize the importance of getting comfortable with the model ecosystem, allowing you to keep up with the latest research and tools. | |
| To do so, here are some exercises to help you get started: | |
| 1. **Explore the Model Hub**: Check out the [Model Hub](https://huggingface.co/models) to see what models are available. You can filter by task, framework, and more. | |
| 2. **Customize your Demo**: In the hands-on, we created a Gradio demo for multi-view diffusion. Try customizing it by, for example, adding a [Slider](https://www.gradio.app/docs/gradio/slider) to control the `elevation` parameter. | |
| 3. **Create your own Model**: If you aren't familiar with machine learning concepts, follow the [NLP Course](https://huggingface.co/learn/nlp-course/chapter1/1). Even if you aren't interested in NLP, this course provides an in-depth introduction to machine learning concepts. | |
| In the next unit, we'll be diving into the specifics of Gaussian Splatting, an ML-friendly 3D representation and recent hot topic in 3D research. | |
| ### Introduction | |
| https://huggingface.co/learn/ml-for-3d-course/unit2/introduction.md | |
| # Introduction | |
| ## Multi-view diffusion | |
| The first part of the pipeline. | |
| Not all generative 3D pipelines use this, and it's more related to diffusion than to 3D. And [there's already a course on that](https://huggingface.co/learn/diffusion-course/unit0/1). | |
| In this section, I'll keep it high-level, focusing on tools and ecosystem, so you can set up your own multi-view diffusion demo. | |
| ### Hands-on (Part 1) | |
| https://huggingface.co/learn/ml-for-3d-course/unit2/hands-on-1.md | |
| # Hands-on (Part 1) | |
| Time to host your own demo! In this portion, you will: | |
| 1. Create a model on Hugging Face. | |
| 2. Upload the necessary files to the model repository. | |
| ## Create a Model | |
| Start by going to [huggingface.co](https://huggingface.co) and logging in or creating an account. | |
| Then, click on `New` -> `Model` in the top left corner. Enter a model name, then click `Create model`. | |
| Your model will be created at the url `https://huggingface.co//`. | |
| ## Access Tokens | |
| For security reasons, you'll need to create an access token to upload files to your model. | |
| Go to [huggingface.co/settings/tokens](https://huggingface.co/settings/tokens) and create a new access token with `write` access. | |
| When git asks for your username and password, use your username and the access token as the password. | |
| ## Upload Files | |
| Download [git](https://git-scm.com/downloads) if you don't have it. | |
| Open a terminal. Then, clone my existing [multi-view-diffusion](https://huggingface.co/dylanebert/multi-view-diffusion) model repository: | |
| ```bash | |
| git clone https://huggingface.co/dylanebert/multi-view-diffusion | |
| cd multi-view-diffusion | |
| ``` | |
| Then, upload these files to your model repository: | |
| ```bash | |
| git remote set-url origin https://huggingface.co// | |
| git push | |
| ``` | |
| Replacing `` and `` with your username and model name. | |
| Congratulations! If everything worked correctly, you should see your files at `https://huggingface.co//`. | |
| ### Pipeline | |
| https://huggingface.co/learn/ml-for-3d-course/unit2/pipeline.md | |
| # Pipeline | |
| [](https://githubtocolab.com/dylanebert/ml-for-3d-course-notebooks/blob/main/multi_view_diffusion.ipynb) | |
| In our case, we'll be using a pretrained pipeline: | |
| ```python | |
| import torch | |
| from diffusers import DiffusionPipeline | |
| multi_view_diffusion_pipeline = DiffusionPipeline.from_pretrained( | |
| "dylanebert/multi-view-diffusion", | |
| custom_pipeline="dylanebert/multi-view-diffusion", | |
| torch_dtype=torch.float16, | |
| trust_remote_code=True, | |
| ).to("cuda") | |
| ``` | |
| The name of the model is [dylanebert/multi-view-diffusion](https://huggingface.co/dylanebert/multi-view-diffusion), a mirror of [ashawkey/mvdream-sd2.1-diffusers](https://huggingface.co/ashawkey/mvdream-sd2.1-diffusers). For any pretrained model, you can find the model card on the Hugging Face Hub at `https://huggingface.co/`, which contains information about the model. | |
| In our case, we also need to load the custom pipeline (also at `dylanebert/multi-view-diffusion`) to use the model. This is because diffusers doesn't officially support 3D. So, for the purposes of this course, I've wrapped the model in a custom pipeline that allows you to use it for 3D tasks. | |
| ## Load an Image | |
| ```python | |
| import requests | |
| from PIL import Image | |
| from io import BytesIO | |
| image_url = "https://huggingface.co/datasets/dylanebert/3d-arena/resolve/main/inputs/images/a_cat_statue.jpg" | |
| response = requests.get(image_url) | |
| image = Image.open(BytesIO(response.content)) | |
| image | |
| ``` | |
|  | |
| With this code, we load and display the famous [Cat Statue](https://huggingface.co/datasets/dylanebert/3d-arena/resolve/main/inputs/images/a_cat_statue.jpg), used for image-to-3D demos. | |
| ## Run the Pipeline | |
| ```python | |
| import numpy as np | |
| def create_image_grid(images): | |
| images = [Image.fromarray((img * 255).astype("uint8")) for img in images] | |
| width, height = images[0].size | |
| grid_img = Image.new("RGB", (2 * width, 2 * height)) | |
| grid_img.paste(images[0], (0, 0)) | |
| grid_img.paste(images[1], (width, 0)) | |
| grid_img.paste(images[2], (0, height)) | |
| grid_img.paste(images[3], (width, height)) | |
| return grid_img | |
| image = np.array(image, dtype=np.float32) / 255.0 | |
| images = multi_view_diffusion_pipeline("", image, guidance_scale=5, num_inference_steps=30, elevation=0) | |
| create_image_grid(images) | |
| ``` | |
| Finally, we run the pipeline on the image. | |
| The `create_image_grid` function isn't part of the pipeline. It's just a helper function to display the results in a grid. | |
| To run the pipeline, we simply prepare the image by converting it to a normalized numpy array: | |
| `image = np.array(image, dtype=np.float32) / 255.0` | |
| Then, we pass it to the pipeline: | |
| `images = multi_view_diffusion_pipeline("", image, guidance_scale=5, num_inference_steps=30, elevation=0)` | |
| Where parameters `guidance_scale`, `num_inference_steps`, and `elevation` are specific to the multi-view diffusion model. | |
|  | |
| ## Conclusion | |
| Congratulations! You've run a multi-view diffusion pipeline. | |
| Now what about hosting your own demo? | |
| ### Hands-on (Part 2) | |
| https://huggingface.co/learn/ml-for-3d-course/unit2/hands-on-2.md | |
| # Hands-on (Part 2) | |
| [](https://githubtocolab.com/dylanebert/ml-for-3d-course-notebooks/blob/main/multi_view_diffusion.ipynb) | |
| Time to host your own demo! In this portion, you will: | |
| 1. Re-run the notebook with your own model. | |
| 2. Create a demo using Gradio. | |
| 3. (Optional) Deploy your demo. | |
| ## Re-Run the Notebook | |
| In the notebook, replace the model name with your own model name: | |
| ```python | |
| import torch | |
| from diffusers import DiffusionPipeline | |
| multi_view_diffusion_pipeline = DiffusionPipeline.from_pretrained( | |
| "/", | |
| custom_pipeline="dylanebert/multi-view-diffusion", | |
| torch_dtype=torch.float16, | |
| trust_remote_code=True, | |
| ).to("cuda") | |
| ``` | |
| Then, re-run the notebook. You should see the same results as before. | |
|  | |
| ## Gradio Demo | |
| Now, let's create a Gradio demo: | |
| ```python | |
| import gradio as gr | |
| def run(image): | |
| image = np.array(image, dtype=np.float32) / 255.0 | |
| images = multi_view_diffusion_pipeline("", image, guidance_scale=5, num_inference_steps=30, elevation=0) | |
| images = [Image.fromarray((img * 255).astype("uint8")) for img in images] | |
| width, height = images[0].size | |
| grid_img = Image.new("RGB", (2 * width, 2 * height)) | |
| grid_img.paste(images[0], (0, 0)) | |
| grid_img.paste(images[1], (width, 0)) | |
| grid_img.paste(images[2], (0, height)) | |
| grid_img.paste(images[3], (width, height)) | |
| return grid_img | |
| demo = gr.Interface(fn=run, inputs="image", outputs="image") | |
| demo.launch() | |
| ``` | |
| The `run` method combines all the code from earlier in a single function. The `gr.Interface` method then uses this function to create a demo with `image` inputs and `image` outputs. | |
| Congratulations! You've created a Gradio demo for your model. | |
| ## (Optional) Deploy Your Demo | |
| You probably want to run your demo outside of Colab. | |
| There are many ways to do this: | |
| ### Option 1: Create a Space | |
| Go to [Hugging Face Spaces](https://huggingface.co/spaces) and create a new Space. Choose the `Gradio Space SDK`. Create a new file in the Space called `app.py` and paste the code from the Gradio demo. Copy the demo [requirements.txt](https://huggingface.co/spaces/dylanebert/multi-view-diffusion/raw/main/requirements.txt) into the Space. | |
| For a complete example, check out this [Space](https://huggingface.co/spaces/dylanebert/multi-view-diffusion), then click `Files` in the top right to view the source code. | |
| > Note: This approach requires a GPU to host publicly, which costs money. However, you can run the demo locally for free, following the instructions in [Option 3](#option-3-run-locally). | |
| ### Option 2: Gradio Deploy | |
| Gradio makes it easy to deploy your demo to a server using the `gradio deploy` command. | |
| For more details, check out the [Gradio documentation](https://www.gradio.app/guides/sharing-your-app). | |
| ### Option 3: Run locally | |
| To run locally, simply copy the code into a Python file and run it on your machine. | |
| The full source file should look like this: | |
| ```python | |
| import gradio as gr | |
| import numpy as np | |
| import torch | |
| from diffusers import DiffusionPipeline | |
| from PIL import Image | |
| multi_view_diffusion_pipeline = DiffusionPipeline.from_pretrained( | |
| "dylanebert/multi-view-diffusion", | |
| custom_pipeline="dylanebert/multi-view-diffusion", | |
| torch_dtype=torch.float16, | |
| trust_remote_code=True, | |
| ).to("cuda") | |
| def run(image): | |
| image = np.array(image, dtype=np.float32) / 255.0 | |
| images = multi_view_diffusion_pipeline( | |
| "", image, guidance_scale=5, num_inference_steps=30, elevation=0 | |
| ) | |
| images = [Image.fromarray((img * 255).astype("uint8")) for img in images] | |
| width, height = images[0].size | |
| grid_img = Image.new("RGB", (2 * width, 2 * height)) | |
| grid_img.paste(images[0], (0, 0)) | |
| grid_img.paste(images[1], (width, 0)) | |
| grid_img.paste(images[2], (0, height)) | |
| grid_img.paste(images[3], (width, height)) | |
| return grid_img | |
| demo = gr.Interface(fn=run, inputs="image", outputs="image") | |
| demo.launch() | |
| ``` | |
| To set up and run this demo in a virtual Python environment, run the following: | |
| ```bash | |
| # Setup | |
| python -m venv venv | |
| source venv/bin/activate | |
| pip install -r https://huggingface.co/spaces/dylanebert/multi-view-diffusion/raw/main/requirements.txt | |
| # Run | |
| python app.py | |
| ``` | |
| > Note: This was tested using Python 3.10.12 and CUDA 12.1 on an NVIDIA RTX 4090. | |
| ### Hands-on | |
| https://huggingface.co/learn/ml-for-3d-course/unit3/hands-on.md | |
| # Hands-on | |
| [](https://githubtocolab.com/dylanebert/ml-for-3d-course-notebooks/blob/main/gaussian_splatting.ipynb) | |
| The goal of this hands-on is to build a text-to-splat pipeline, using [LGM](https://huggingface.co/spaces/dylanebert/LGM-mini) (Large Gaussian Model) as an example. | |
| This consists of two parts of the generative 3D pipeline: | |
| 1. Multi-view Diffusion | |
| 2. ML-friendly 3D (Gaussian Splatting) | |
| ## Setup | |
| Open the Colab notebook linked above. Click `Runtime` -> `Change runtime type` and select `GPU` as the hardware accelerator. | |
| Then, start by installing the necessary dependencies: | |
| ```python | |
| !pip install -r https://huggingface.co/spaces/dylanebert/LGM-mini/raw/main/requirements.txt | |
| !pip install https://huggingface.co/spaces/dylanebert/LGM-mini/resolve/main/wheel/diff_gaussian_rasterization-0.0.0-cp310-cp310-linux_x86_64.whl | |
| ``` | |
| As before, if the notebook asks you to restart the session, do so, then rerun the code block. | |
| ## Load the Models | |
| Just like in the multi-view diffusion notebook, load the pretrained multi-view diffusion model: | |
| ```python | |
| import torch | |
| from diffusers import DiffusionPipeline | |
| image_pipeline = DiffusionPipeline.from_pretrained( | |
| "dylanebert/multi-view-diffusion", | |
| custom_pipeline="dylanebert/multi-view-diffusion", | |
| torch_dtype=torch.float16, | |
| trust_remote_code=True, | |
| ).to("cuda") | |
| ``` | |
| This is because multi-view diffusion is the first step in the LGM pipeline. | |
| Then, load the generative Gaussian Splatting model, the main contribution of LGM: | |
| ```python | |
| splat_pipeline = DiffusionPipeline.from_pretrained( | |
| "dylanebert/LGM", | |
| custom_pipeline="dylanebert/LGM", | |
| torch_dtype=torch.float16, | |
| trust_remote_code=True, | |
| ).to("cuda") | |
| ``` | |
| ## Load an Image | |
| As before, load the famous Cat Statue image: | |
| ```python | |
| import requests | |
| from PIL import Image | |
| from io import BytesIO | |
| image_url = "https://huggingface.co/datasets/dylanebert/3d-arena/resolve/main/inputs/images/a_cat_statue.jpg" | |
| response = requests.get(image_url) | |
| image = Image.open(BytesIO(response.content)) | |
| image | |
| ``` | |
| ## Run the Pipeline | |
| Finally, pass the image through both pipelines. The output will be a matrix of splat data, which can be saved with `splat_pipeline.save_ply()`. | |
| ```python | |
| import numpy as np | |
| from google.colab import files | |
| input_image = np.array(image, dtype=np.float32) / 255. | |
| multi_view_images = image_pipeline("", input_image, guidance_scale=5, num_inference_steps=30, elevation=0) | |
| ``` | |
|  | |
| ```python | |
| splat = splat_pipeline(multi_view_images) | |
| output_path = "/tmp/output.ply" | |
| splat_pipeline.save_ply(splat, output_path) | |
| files.download(output_path) | |
| ``` | |
| This includes `files.download()` to download the file to your local machine when running the notebook in Colab. If you're running the notebook locally, you can remove this line. | |
| Congratulations! You've run the LGM pipeline. | |
| ## Gradio Demo | |
| Now, let's create a Gradio demo to run the model end-to-end with an easy-to-use interface: | |
| ```python | |
| import gradio as gr | |
| def run(image): | |
| input_image = image.astype("float32") / 255.0 | |
| images = image_pipeline("", input_image, guidance_scale=5, num_inference_steps=30, elevation=0) | |
| splat = splat_pipeline(images) | |
| output_path = "/tmp/output.ply" | |
| splat_pipeline.save_ply(splat, output_path) | |
| return output_path | |
| demo = gr.Interface(fn=run, inputs="image", outputs=gr.Model3D()) | |
| demo.launch() | |
| ``` | |
| This will create a Gradio demo that takes an image as input and outputs a 3D splat. | |
| ### What is it? | |
| https://huggingface.co/learn/ml-for-3d-course/unit3/what-is-it.md | |
| # What is it? | |
| Gaussian Splatting is a **differentiable rasterization technique**. | |
| ## Differentiable Rasterization | |
| In simple terms: | |
| - Differentiable can be thought of as a fancy way to say "AI-compatible" | |
| - Rasterization means taking data and drawing it on the screen | |
| Rasterization is already really common. It usually takes the form of [triangle rasterization](https://en.wikipedia.org/wiki/Rasterisation), where 3D data is converted to 2D pixel data and drawn on the screen. That's how meshes are usually rendered. | |
|  | |
| However, triangle rasterization isn't very AI-compatible. This is because it includes discrete decisions like: | |
| - Is this pixel inside the triangle? | |
| Neural networks don't like discrete decisions. They want everything to be fuzzy and continous - or in other words, *differentiable*. | |
| ## Gaussian Splatting | |
| Gaussian Splatting is a differentiable rasterization technique. But how does it actually work? | |
| Splats are composed of millions of points, where each point is composed of four parameters: | |
| - **Position**: where it's located (XYZ) | |
| - **Covariance**: how it's stretched (3x3 matrix) | |
| - **Color**: what color it is (RGB) | |
| - **Alpha**: how transparent it is (α) | |
| Then, to rasterize a splat, these points are projected into 2D. Then, for every pixel, contribute the contribution of every point. Or, in pseudocode: | |
| ```python | |
| splat2d = splat.project_and_sort() | |
| for point in splat2d: | |
| for pixel in image: | |
| pixel += compute_contribution(point, pixel) | |
| ``` | |
| The contribution of a point diminishes the further it is from the pixel. The points also need to be sorted, since they are blended back-to-front. | |
| In theory, every point contributes to every pixel, which is very inefficient. However, that's okay, because it's *differentiable*. | |
| In practice, this is optimized with a tile-based rasterization method, as detailed in the [original paper](https://huggingface.co/papers/2308.04079). | |
| ## Inference | |
| If you're not training a model, then it doesn't matter if it's differentiable. You can just treat each point as an instanced quad, as in open-source web viewers like [gsplat.js](https://github.com/huggingface/gsplat.js). | |
| This can be seen in action [here](https://huggingface.co/spaces/dylanebert/igf). | |
| ## Training | |
| The [original paper](https://huggingface.co/papers/2308.04079) intializes the points using [Structure-from-Motion](https://en.wikipedia.org/wiki/Structure_from_motion), a traditional algorithm for 3D reconstruction. | |
| 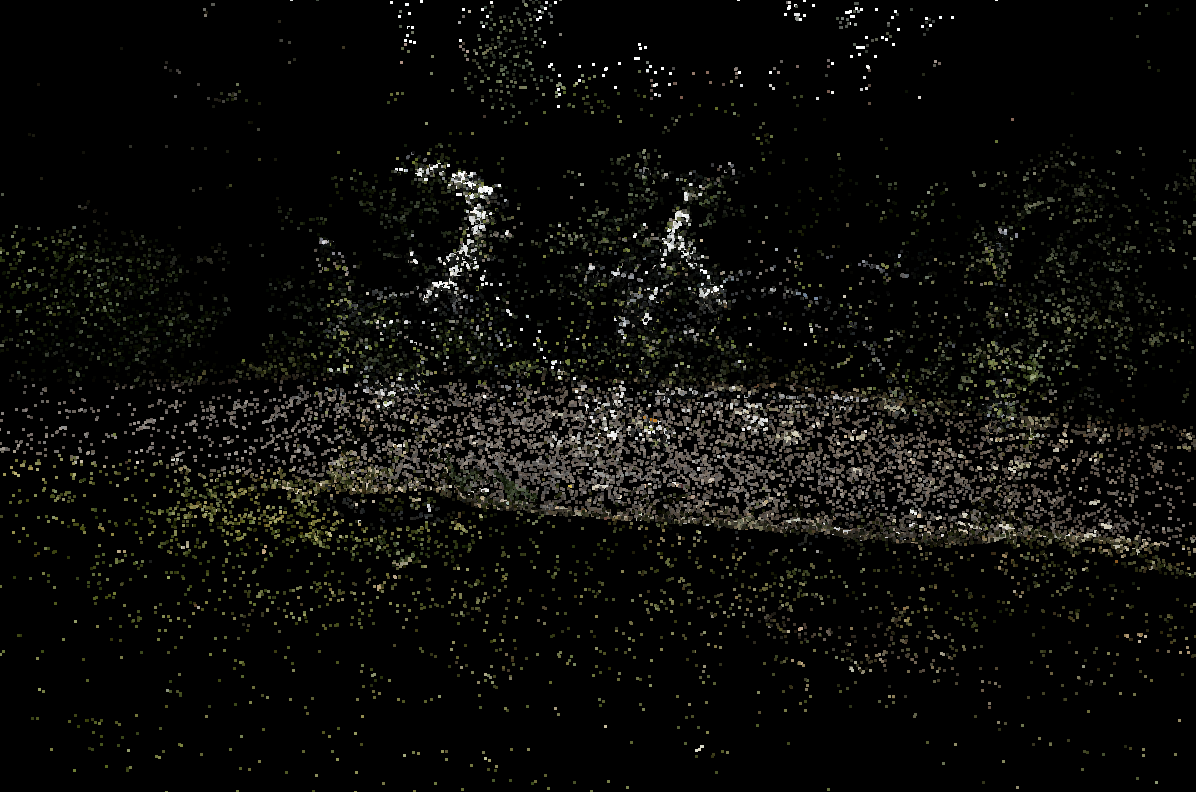 | |
| These points are then rasterized using the tile-based method, and the loss is computed by comparing the rasterized image to the ground truth. Gradient descent is applies to adjust the point parameters (position, covariance, color, alpha). | |
| 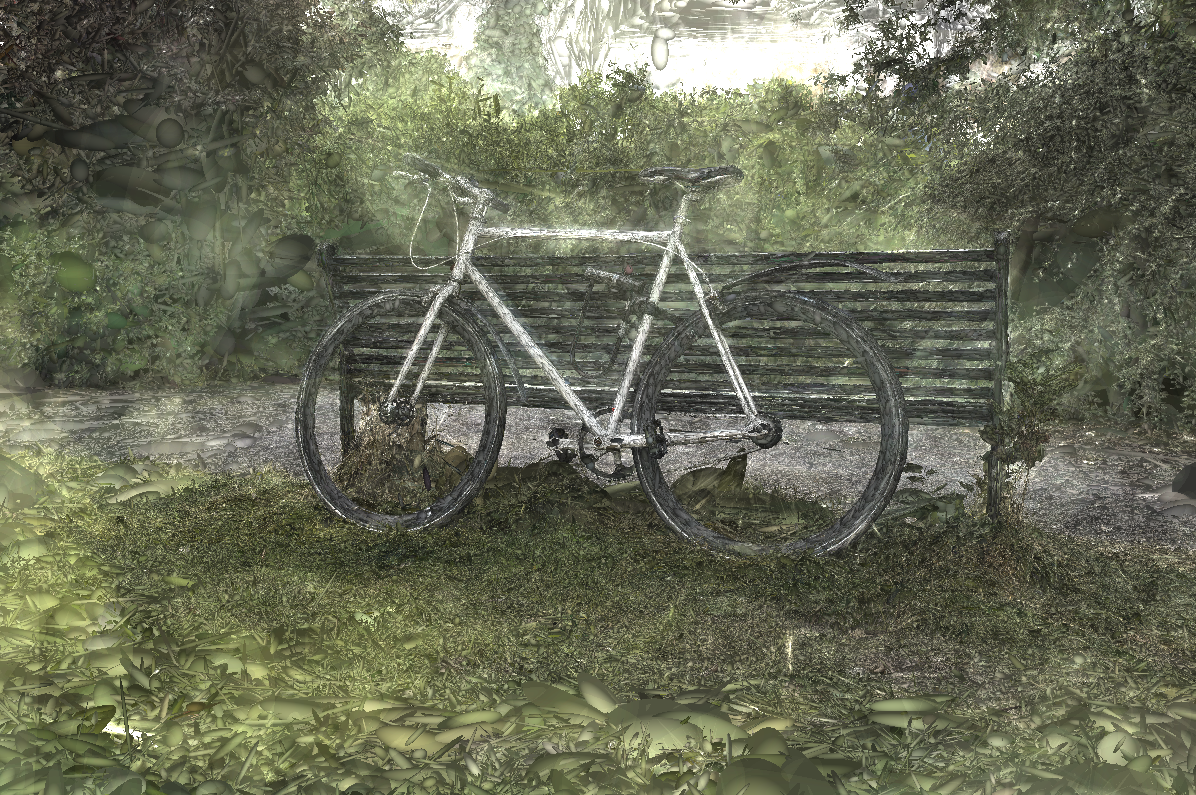 | |
| The original paper also uses automated densification and pruning to automatically add and remove points as needed. More details can be found [here](https://huggingface.co/blog/gaussian-splatting). | |
| 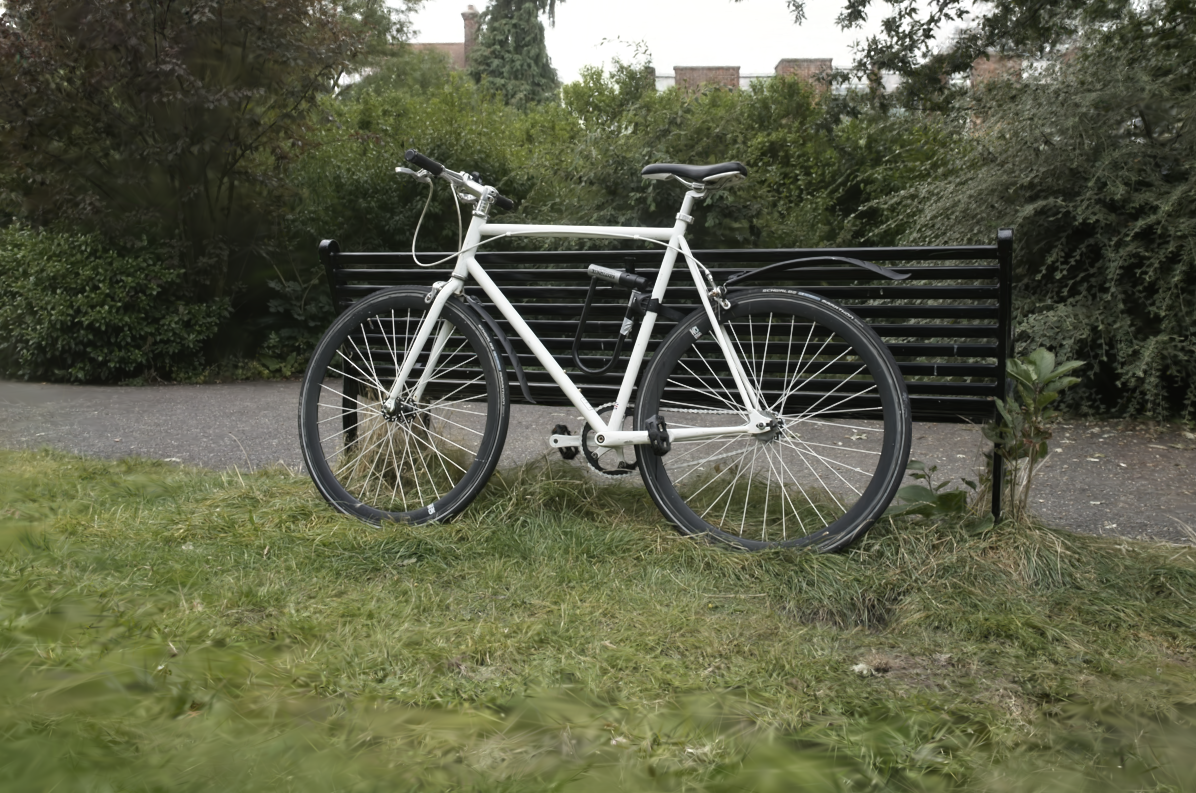 | |
| ## Generative 3D | |
| The original approach is suitable for learning individual scenes from photos. However, the concept of differentiable rasterization generalizes to more complex models like neural networks. | |
| This is the case with generative 3D models like [LGM](https://huggingface.co/spaces/dylanebert/LGM-mini), which we'll be using in the next section to build our own generative 3D demo. | |
| ### Bonus | |
| https://huggingface.co/learn/ml-for-3d-course/unit3/bonus.md | |
| # Bonus | |
| This unit took a closer look at Gaussian Splatting, a differentiable rasterization technique that also serves as an ML-friendly 3D representation. While this is a special case due to its real-time rendering capabilities, it's one of many representations used in generative 3D research. | |
| Most recently, triplanes have emerged as the latest state-of-the-art in final mesh quality, used in pipelines like [InstantMesh](https://huggingface.co/spaces/TencentARC/InstantMesh). You can learn more about them in this [Community Notebook](https://colab.research.google.com/github/FeMa42/OpenLRM/blob/main/Introduction_to_triplanes_colab.ipynb) provided by Damian. | |
| If you're interested in learning more about Gaussian Splatting, here are some pointers: | |
| - [Nerfstudio gsplat](https://github.com/nerfstudio-project/gsplat): An open-source implementation of Gaussian Splatting | |
| - [gsplat.js](https://github.com/huggingface/gsplat.js): An open-source JavaScript library for splat rendering | |
| - [UnityGaussianSplatting](https://github.com/aras-p/UnityGaussianSplatting): A Unity implementation of Gaussian Splatting (don't be fooled by it being labeled a "toy" - it's a powerful tool!) | |
| - In the capstone of this course, you'll have the option of targeting meshes or Gaussian Splatting as the final output of your generative model | |
| In the next unit, we'll be diving into meshes, the representation used in 3D applications everywhere. | |
| ### Introduction | |
| https://huggingface.co/learn/ml-for-3d-course/unit3/introduction.md | |
| # Introduction | |
| ## ML-friendly 3D | |
| Let's take a step back and consider the generative 3D pipeline as a whole. | |
|  | |
| After multi-view diffusion comes ML-friendly 3D. This is some non-mesh representation of 3D that's easy for AI to handle. | |
| In the current 3D research ecosystem, this can be a lot of things: | |
| - **Gaussian Splatting**: Detailed in this unit | |
| - **Triplanes**: Latest state-of-the-art. Learn more in this [Community Notebook](https://colab.research.google.com/github/FeMa42/OpenLRM/blob/main/Introduction_to_triplanes_colab.ipynb) | |
| - **NeRFs**: Synthesize novel views with a neural network | |
| - and more | |
| This is all changing very rapidly. So, like in the case of multi-view diffusion, ML-friendly 3D can be treated like a black box, using [pre-trained models](https://huggingface.co/models?pipeline_tag=image-to-3d&sort=trending). | |
| ## Gaussian Splatting | |
| In this unit, I'll be diving deeper into one of these: Gaussian Splatting. | |
| The reason I'm diving deeper into this is that, unlike the other representations, splats can be [rendered in real-time](https://huggingface.co/spaces/dylanebert/4DGS-demo), making them suitable for end-to-end 3D applications where everything is AI-compatible. | |
| Let's get started! | |
| ### Hands-on | |
| https://huggingface.co/learn/ml-for-3d-course/unit4/hands-on.md | |
| # Hands-on | |
| Initially, we planned to walk through the Marching Cubes algorithm and apply it to the [LGM Demo](https://huggingface.co/spaces/dylanebert/LGM-mini). However, recent advancements in mesh generation have made this approach less relevant. | |
| While a deep dive into the methods behind [MeshAnything](https://huggingface.co/spaces/Yiwen-ntu/MeshAnything) would be much more pertinent, its newness and [non-commercial license](https://github.com/buaacyw/MeshAnything/blob/main/LICENSE.txt) make it suboptimal for the time being. | |
| Instead, here are some resources based on your goals: | |
| - [Splat to Mesh](https://huggingface.co/spaces/dylanebert/splat-to-mesh): If you followed along with with the LGM-based activities and want to produce the final mesh, this open source demo is based on the original [LGM](https://github.com/3DTopia/LGM) codebase. Note that this method is slow and resource-intensive. | |
| - [InstantMesh](https://huggingface.co/spaces/TencentARC/InstantMesh): This is fast and state-of-the-art approach uses FlexiCubes to produce the final mesh. It currently ranks toward the top of the [3D Arena](https://huggingface.co/spaces/dylanebert/3d-arena) leaderboard. | |
| - [meshgpt-pytorch](https://github.com/lucidrains/meshgpt-pytorch): This open source reimplementation of [MeshGPT](https://huggingface.co/papers/2311.15475) provides a good starting point for open-source differentiable mesh generation. [MeshAnything](https://huggingface.co/papers/2311.15475) builds upon MeshGPT. Note: This implementation only provides architecture, not weights. | |
| These resources should help you continue exploring mesh generation and its most recent advancements. | |
| ### Marching Cubes | |
| https://huggingface.co/learn/ml-for-3d-course/unit4/marching-cubes.md | |
| # Marching Cubes | |
| Marching Cubes is an algorithm that converts a volumetric representation to a dense mesh. | |
|  | |
| 1. **Divide the Space into Voxels:** Split the 3D space into a grid of voxels (cubic cells). The size of each voxel determines the mesh resolution. | |
| 2. **Sample the Eight Vertex Positions:** For each voxel, sample the density at the eight vertices (corners). Determine if each vertex is inside or outside the surface based on its density. | |
| 3. **Determine the Triangle Configuration:** Each voxel has eight vertices, each with two possible states (inside or outside), yielding 256 possible configurations. Each configuration corresponds to a specific triangulation pattern. | |
| Let's walk through these steps in more detail. | |
| ### 1. Divide the Space into Voxels | |
| The first step is to divide the 3D space into a grid of voxels. The size of each voxel will determine the resolution of the mesh. | |
| ### 2. Sample the Eight Vertex Positions | |
| For each voxel, the algorithm samples the density at the eight vertices. Depending on the density, each vertex is classified as either `inside` or `outside` the surface. | |
| ### 3. Determine the Triangle Configuration | |
| Each voxel's eight vertices can be in two possible states, resulting in $2^8 = 256$ possible configurations. Each configuration corresponds to a specific triangulation pattern. | |
|  | |
| ### 4. Generate the Mesh | |
| To generate the final mesh, the algorithm "marches" through each voxel and applies the corresponding triangle configuration, hence the name "Marching Cubes". | |
|  | |
| This process produces a dense, rough mesh that approximates the surface of the volume. | |
| ## Limitations | |
| While useful for visualization, Marching Cubes meshes are mostly unsuitable for productions like games due to several limiting factors: | |
| 1. **Polygon Count:** High polygon meshes require more computation for rendering, which can significantly impact performance in real-time applications. | |
| 2. **Edge Flow:** Poor edge flow affects how the mesh deforms when animated, resulting in undesirable artifacts like creasing and pinching. | |
| 3. **Texturing:** The dense and irregular topology complicates UV mapping and texturing, resulting in texture artifacts. | |
|  | |
| ### Improvements | |
| Techniques like [FlexiCubes](https://research.nvidia.com/labs/toronto-ai/flexicubes/) address some limitations by allowing the mesh vertices to move, creating smoother surfaces. This approach is used by [InstantMesh](https://huggingface.co/spaces/TencentARC/InstantMesh), the current [leading](https://huggingface.co/spaces/dylanebert/3d-arena) open-source 3D pipeline. However, the resulting meshes remain overly dense and impractical for production. | |
| ## In Practice | |
| Cleaning up the topology of Marching Cubes output often requires more time and effort than creating a mesh from scratch. This creates a major bottleneck for ML for 3D applications. Gaussian Splatting, as discussed earlier, offers a potential solution to this bottleneck. | |
| However, recent work has emerged that directly addresses this bottleneck, using differentiable techniques to produce low-poly meshes with higher-quality topology. This will be covered in the next section. | |
| ### Introduction | |
| https://huggingface.co/learn/ml-for-3d-course/unit4/introduction.md | |
| # Introduction | |
| ## Meshes | |
| Let's revisit the generative 3D pipeline. | |
|  | |
| Earlier in the course, we discussed the limitations of the mesh side of the pipeline, particularly with Marching Cubes, which produces dense and rough meshes unsuitable for production. | |
|  | |
| This is no longer the full story. | |
| Recent advancements have emerged, allowing the conversion of dense meshes to low-poly meshes differentiably. | |
|  | |
| In this unit of the course, we'll cover: | |
| - Marching Cubes | |
| - Mesh Generation | |
| Let's get started! | |
| ### Mesh Generation | |
| https://huggingface.co/learn/ml-for-3d-course/unit4/mesh-generation.md | |
| # Mesh Generation | |
| New solutions have emerged that address the limitations of Marching Cubes, allowing the conversion of dense meshes to low-poly meshes. | |
| Earlier in the course, we highlighted the significance of **differentiability** and how mesh rendering is non-differentiable, involving discrete decisions like: | |
| - Is this pixel inside the triangle? | |
| While this remains true, new research introduces a differentiable approach to mesh generation by treating mesh triangles as discrete symbols, similar to words in a language model. | |
| ## MeshAnything | |
| [MeshAnything](https://huggingface.co/spaces/Yiwen-ntu/MeshAnything) is a recent research project that converts dense meshes to low-poly meshes using techniques introduced in [MeshGPT](https://huggingface.co/papers/2311.15475). | |
| The main components of MeshAnything are: | |
| 1. **VQ-VAE Encoder:** Encodes dense 3D data to a discrete latent representation using a Vector Quantization (VQ) Variational Autoencoder (VAE). | |
| 2. **Autoregressive Transformer Decoder:** Generates the triangles of the mesh using an autoregressive transformer decoder. | |
| More details can be found in the paper [MeshAnything: Artist-Created Mesh Generation with Autoregressive Transformers](https://huggingface.co/papers/2406.10163). | |
|  | |
| ## Implications | |
| MeshAnything represents a major step in 3D mesh generation, addressing a major bottleneck toward practical generative 3D tools. | |
| However, the current results are comparable to or worse than traditional topology reduction methods like [Decimate](https://docs.blender.org/manual/en/latest/modeling/modifiers/generate/decimate.html), still requiring significant manual refinement. | |
| Differentiable mesh generation opens the door to context-aware topology reduction, i.e. accounting for shape and deformation. While still a work in progress, solving this will lead to highly practical 3D tools. | |
| ### Run locally | |
| https://huggingface.co/learn/ml-for-3d-course/unit5/run-locally.md | |
| # Run locally | |
| [](https://githubtocolab.com/dylanebert/ml-for-3d-course-notebooks/blob/main/capstone.ipynb) | |
| The instructions below are tested on an RTX 4090 on WSL2 Ubuntu 22.04. Instructions will differ and may not work, depending on your setup. | |
| 1. Install `git`, `python 3.10`, and `cuda` if not already installed. | |
| 2. Open your terminal. | |
| 3. Clone your space repository, replacing the URL below with your space URL. | |
| ```bash | |
| git clone https://huggingface.co/spaces/dylanebert/LGM-tiny | |
| ``` | |
| 4. Navigate into the space folder. | |
| ```bash | |
| cd LGM-tiny | |
| ``` | |
| 5. Create a virtual environment and install necessary dependencies. | |
| ```bash | |
| python -m venv venv | |
| source venv/bin/activate | |
| pip install -r requirements.txt | |
| ``` | |
| 6. Run the demo. | |
| ```bash | |
| python app.py | |
| ``` | |
| ### Walkthrough | |
| https://huggingface.co/learn/ml-for-3d-course/unit5/walkthrough.md | |
| # Walkthrough | |
| [](https://githubtocolab.com/dylanebert/ml-for-3d-course-notebooks/blob/main/capstone.ipynb) | |
| This section will walk you step-by-step through the easiest way to set up a demo based on [LGM](https://huggingface.co/spaces/ashawkey/LGM), as covered in previous units. | |
| ## 1. Duplicate the model | |
| Start by duplicating the [LGM-full](https://huggingface.co/dylanebert/LGM-full) model. | |
| 1. Go to the [Repo duplicator](https://huggingface.co/spaces/huggingface-projects/repo_duplicator). | |
| 2. Generate a `write token` in your [account settings](https://hf.co/settings/tokens). Copy it into the `token` field. | |
| 3. Enter `dylanebert/LGM-full` in the `source_repo` field. | |
| 4. Enter `{username}/{model_name}` in the `dst_repo` field, replacing `{username}` with your Hugging Face account username, and `{model_name}` with any name you like, such as `LGM`. | |
| 5. Click Submit. | |
| You will see a link labeled "find your repo **here**", which leads to `http://huggingface.co/{username}/{model_name}`. | |
|  | |
| Congratulations! You can now use this model with Diffusers, and it will appear in [hf.co/models](https://huggingface.co/models?pipeline_tag=image-to-3d&sort=trending). | |
| ## 2. Duplicate the space | |
| Go to the [LGM Tiny](https://huggingface.co/spaces/dylanebert/LGM-tiny) space, which provides a simplified image-to-3D demo. | |
| 1. Click the `Duplicate Space` button. | |
| 2. Choose free hardware, or ZeroGPU Nvidia A100 if available. | |
| 3. Click `Files` in the top right. | |
| 4. Click `app.py` to view the demo source code. | |
| 5. Click `edit` to change the code. | |
| 6. Replace the two instances of `dylanebert/LGM-full` with your model path, e.g. `{username}/{model_name}`. | |
| 7. Click `Commit changes`. | |
| Congratulations! You've created a demo and met the minimum requirements for this capstone project. | |
| ## So how do I run it? | |
| The demo requires a GPU, so it won't work on free hardware. However, there are many free options: | |
| 1. **Run in this notebook**: Validate the code quickly. | |
| 2. **Run locally**: Clone your space and run it locally. | |
| 3. **Community grant**: Building something cool? Apply for a community GPU grant in your space settings. | |
| 4. **Run via API**: Less flexible, but runs on free hardware. | |
| The following sections will walk you through each of these options. | |
| ### Run in notebook | |
| https://huggingface.co/learn/ml-for-3d-course/unit5/run-in-notebook.md | |
| # Run in notebook | |
| [](https://githubtocolab.com/dylanebert/ml-for-3d-course-notebooks/blob/main/capstone.ipynb) | |
| The first open is to run in a Colab notebook. This is the easiest way to validate the code quickly. | |
| ## Setup | |
| 1. Click the "Open in Colab" button above. | |
| 2. Change the runtime type to GPU. | |
| 3. Scroll down to the `Run in this notebook section`. | |
| ## Run the demo | |
| Start by installing dependencies. | |
| ```bash | |
| !pip install -r https://huggingface.co/spaces/dylanebert/LGM-tiny/raw/main/requirements.txt | |
| ``` | |
| Then, run the demo code. This is exactly the same as in the space `app.py`. To ensure your model is working as expected, replace both instances of `dylanebert/LGM-full` with your `{username}/{model_name}`. Then, run the code. | |
| ```python | |
| import shlex | |
| import subprocess | |
| import gradio as gr | |
| import numpy as np | |
| import torch | |
| from diffusers import DiffusionPipeline | |
| subprocess.run( | |
| shlex.split( | |
| "pip install https://huggingface.co/spaces/dylanebert/LGM-mini/resolve/main/wheel/diff_gaussian_rasterization-0.0.0-cp310-cp310-linux_x86_64.whl" | |
| ) | |
| ) | |
| pipeline = DiffusionPipeline.from_pretrained( | |
| "dylanebert/LGM-full", | |
| custom_pipeline="dylanebert/LGM-full", | |
| torch_dtype=torch.float16, | |
| trust_remote_code=True, | |
| ).to("cuda") | |
| def run(image): | |
| input_image = np.array(image, dtype=np.float32) / 255.0 | |
| splat = pipeline( | |
| "", input_image, guidance_scale=5, num_inference_steps=30, elevation=0 | |
| ) | |
| splat_file = "/tmp/output.ply" | |
| pipeline.save_ply(splat, splat_file) | |
| return splat_file | |
| demo = gr.Interface( | |
| fn=run, | |
| title="LGM Tiny", | |
| description="An extremely simplified version of [LGM](https://huggingface.co/ashawkey/LGM). Intended as resource for the [ML for 3D Course](https://huggingface.co/learn/ml-for-3d-course/unit0/introduction).", | |
| inputs="image", | |
| outputs=gr.Model3D(), | |
| examples=[ | |
| "https://huggingface.co/datasets/dylanebert/iso3d/resolve/main/jpg@512/a_cat_statue.jpg" | |
| ], | |
| cache_examples=True, | |
| allow_duplication=True, | |
| ) | |
| demo.queue().launch() | |
| ``` | |
| ## Demo breakdown | |
| Let's break down the demo code. | |
| ### Import dependencies | |
| Import the required libraries. | |
| ```python | |
| import shlex | |
| import subprocess | |
| import gradio as gr | |
| import numpy as np | |
| import spaces | |
| import torch | |
| from diffusers import DiffusionPipeline | |
| ``` | |
| ### Install diff-gaussian-rasterization | |
| For the gaussian splatting step of LGM, we need to install a custom wheel. This is a workaround for the space to run on [ZeroGPU](https://huggingface.co/zero-gpu-explorers). | |
| ```python | |
| subprocess.run( | |
| shlex.split( | |
| "pip install https://huggingface.co/spaces/dylanebert/LGM-mini/resolve/main/wheel/diff_gaussian_rasterization-0.0.0-cp310-cp310-linux_x86_64.whl" | |
| ) | |
| ) | |
| ``` | |
| ### Construct the pipeline | |
| Construct the [LGM](https://huggingface.co/dylanebert/LGM-full) pipeline. Replace `dylanebert/LGM-full` with your `{username}/{model_name}`. | |
| ```python | |
| pipeline = DiffusionPipeline.from_pretrained( | |
| "dylanebert/LGM-full", | |
| custom_pipeline="dylanebert/LGM-full", | |
| torch_dtype=torch.float16, | |
| trust_remote_code=True, | |
| ).to("cuda") | |
| ``` | |
| ### Define the run function | |
| Define the run function that takes an image and returns a ply file. | |
| 1. Convert the image to a numpy array and normalize it to [0, 1]. | |
| 2. Run the pipeline with the default parameters. | |
| 3. Save the ply file to `/tmp/output.ply`. | |
| 4. Return the ply file. | |
| ```python | |
| @spaces.GPU | |
| def run(image): | |
| input_image = np.array(image, dtype=np.float32) / 255.0 | |
| splat = pipeline( | |
| "", input_image, guidance_scale=5, num_inference_steps=30, elevation=0 | |
| ) | |
| splat_file = "/tmp/output.ply" | |
| pipeline.save_ply(splat, splat_file) | |
| return splat_file | |
| ``` | |
| ### Create the demo | |
| Create the demo using [Gradio](https://www.gradio.app/guides/quickstart), which handles the UI for us. | |
| ```python | |
| demo = gr.Interface( | |
| fn=run, | |
| title="LGM Tiny", | |
| description="An extremely simplified version of [LGM](https://huggingface.co/ashawkey/LGM). Intended as resource for the [ML for 3D Course](https://huggingface.co/learn/ml-for-3d-course/unit0/introduction).", | |
| inputs="image", | |
| outputs=gr.Model3D(), | |
| examples=[ | |
| "https://huggingface.co/datasets/dylanebert/iso3d/resolve/main/jpg@512/a_cat_statue.jpg" | |
| ], | |
| cache_examples=True, | |
| allow_duplication=True, | |
| ) | |
| demo.queue().launch() | |
| ``` | |
|  | |
| ### Introduction | |
| https://huggingface.co/learn/ml-for-3d-course/unit5/introduction.md | |
| # Introduction | |
| [](https://githubtocolab.com/dylanebert/ml-for-3d-course-notebooks/blob/main/capstone.ipynb) | |
| Welcome to the final capstone project of the course. | |
| To complete the course and receive a certificate, you will create and host your own Generative 3D model and demo. | |
| ## Requirements | |
| - **Model**: A model hosted under your username, e.g. `hf.co/{username}/{model_name}`. | |
| - Ensure there is a [model card](https://huggingface.co/docs/hub/en/model-cards). | |
| - Tag the model with the `image-to-3d` pipeline tag. | |
| - Apply the correct license if applicable. | |
| - **Space**: A space hosted under your username, e.g. `hf.co/spaces/{username}/{space_name}`. | |
| - Ensure the space converts images (`.png`, `.jpg`) to 3D (`.glb`, `.obj`, `.ply`, `.splat`). | |
| - Reference your model URL in the space README. | |
| ## What's expected | |
| This capstone project is very open-ended. You can: | |
| - Build something from scratch. | |
| - Train or fine-tune an existing open-source model. | |
| - Clone and existing open-source model and change the demo experience. | |
| - Directly clone an open-source model and demo. | |
| Check out [3D Arena](https://huggingface.co/spaces/dylanebert/3d-arena) for the latest image-to-3D demos to use as starting points. | |
| Here is an example [model](https://huggingface.co/dylanebert/LGM-full) and [space](https://huggingface.co/spaces/dylanebert/LGM-tiny). | |
| ## Step-by-step | |
| If you aren't sure how to get started, the following sections will guide you through the process. | |
| Otherwise, you can start right away. | |
| ## Join the community | |
| Want to ask questions? Share your work? Chat with the community? | |
| [Join the Discord](https://hf.co/join/discord)! | |
| ### Run via API | |
| https://huggingface.co/learn/ml-for-3d-course/unit5/run-via-api.md | |
| # Run via API | |
| [](https://githubtocolab.com/dylanebert/ml-for-3d-course-notebooks/blob/main/capstone.ipynb) | |
| To run via API, instead of duplicating the [LGM-tiny](https://huggingface.co/spaces/dylanebert/LGM-tiny) space, duplicate the [LGM-tiny-api](https://huggingface.co/spaces/dylanebert/LGM-tiny-api) space. This contains the following `app.py`. | |
| ```python | |
| import gradio as gr | |
| from gradio_client import Client, file | |
| def run(image_url): | |
| client = Client("dylanebert/LGM-tiny") | |
| image = file(image_url) | |
| result = client.predict(image, api_name="/predict") | |
| return result | |
| demo = gr.Interface( | |
| fn=run, | |
| title="LGM Tiny API", | |
| description="An API wrapper for [LGM Tiny](https://huggingface.co/spaces/dylanebert/LGM-tiny). Intended as a resource for the [ML for 3D Course](https://huggingface.co/learn/ml-for-3d-course).", | |
| inputs=gr.Textbox(label="Image URL", placeholder="Enter image URL, e.g. https://huggingface.co/datasets/dylanebert/iso3d/resolve/main/jpg@512/a_cat_statue.jpg"), | |
| outputs=gr.Model3D(), | |
| examples=[ | |
| "https://huggingface.co/datasets/dylanebert/iso3d/resolve/main/jpg@512/a_cat_statue.jpg" | |
| ], | |
| allow_duplication=True, | |
| ) | |
| demo.queue().launch() | |
| ``` | |
| This will work on CPU, but relies on the original LGM-tiny, instead of your custom model. However, is your focus is on UI/UX or downstream tasks, this may be acceptable. | |
| ### Conclusion | |
| https://huggingface.co/learn/ml-for-3d-course/conclusion/conclusion.md | |
| # Conclusion | |
| Thank you for participating in the Machine Learning for 3D Course! | |
| This has been a high-level overview of what's going on at the intersection of Machine Learning and 3D. For further exploration: | |
| - Check out the [models](https://huggingface.co/models?pipeline_tag=image-to-3d&sort=trending) page for the latest image-to-3D models. | |
| - Keep up with [3D Arena](https://huggingface.co/spaces/dylanebert/3d-arena) for the latest state-of-the-art. | |
| - Explore open-source projects like [InstantMesh](https://github.com/TencentARC/InstantMesh). | |
|  | |
| As the field evolves rapidly, it's easy to get overwhelmed. Stay tuned for more accessible tools and resources as these projects mature. | |
| To receive updates about future course releases, sign up for the course mailing list [here](https://mailchi.mp/911880bcff7d/ml-for-3d-course). | |
| To get involved in the community, [join the Discord](https://hf.co/join/discord). | |
| ### Non-meshes | |
| https://huggingface.co/learn/ml-for-3d-course/unit1/non-meshes.md | |
| # Non-meshes | |
| While nearly all 3D is represented as [meshes](meshes) in real-world applications today, 3D machine learning research often uses non-mesh representations, which are later converted to meshes. | |
| These non-mesh representations may be things like: | |
| 1. Triplanes, such as in [InstantMesh](https://huggingface.co/TencentARC/InstantMesh). | |
| 2. [NeRFs](https://en.wikipedia.org/wiki/Neural_radiance_field), such as in [NeRFiller](https://huggingface.co/papers/2312.04560) | |
| 3. [Splats](https://en.wikipedia.org/wiki/Gaussian_splatting), such as in [LGM](https://huggingface.co/ashawkey/LGM). | |
| These approaches are constantly evolving and may even have changed by the time you're reading this. | |
| Fortunately, in most cases, this can be treated as a black box. You don't need to understand the details of these non-mesh representations to use them in your work. | |
| There is, however, one representation that stands out. | |
| ## Gaussian Splatting | |
| A special case of non-mesh representation is splats, or [Gaussian Splatting](https://en.wikipedia.org/wiki/Gaussian_splatting). | |
| This is because splats can be rendered in real-time, unlike the other non-mesh representations. They are also capable of features like [animation](https://huggingface.co/spaces/dylanebert/4DGS-demo), [physics (hybrid)](https://x.com/HugoDuprez/status/1766019907769000229), and [lighting](https://x.com/Ruben_Fro/status/1719996105675698452). | |
| This means that theoretically, splats could replace meshes in real-world applications. However, the entire real-world 3D ecosystem is built around meshes, so it's unlikely that splats will replace them. They are more likely to have a role in the 3D ecosystem alongside meshes, especially for anticipated applications like real-time generative 3D. | |
| ## In this course | |
| We'll be covering both meshes and Gaussian splatting. | |
| While current [state-of-the-art](https://huggingface.co/TencentARC/InstantMesh) uses triplanes, we won't dive deep into these specifics in this course since they are constantly evolving. | |
| Instead, we will focus on the building blocks of 3D machine learning research. Then, we'll dive deeper into Gaussian Splatting and meshes, since they can be used in real-world applications today. | |
| ### Generative 3D pipelines | |
| https://huggingface.co/learn/ml-for-3d-course/unit1/pipelines.md | |
| # Generative 3D pipelines | |
| Let's take a step back and look at the generative 3D pipelines as a whole. | |
|  | |
| In Step 2, there is some [non-mesh](non-meshes) representation, labeled "ML-friendly 3D", which is converted to a mesh (Step 3) with Marching Cubes. | |
| Before ML-friendly 3D, there is often a step called "multi-view diffusion". This is where a [diffusion](https://huggingface.co/docs/diffusers/en/index) model, like [Stable Diffusion](https://huggingface.co/spaces/stabilityai/stable-diffusion), is used to generate novel views of an object - either from source images or from text. | |
| This part of the pipeline is very technical and evolving rapidly, being more related to diffusion than 3D. Therefore, in this course, we'll treat it as a building block, focusing on how you can harness this building block using the Hugging Face ecosystem. | |
| If you want to learn more about the specifics of diffusion models, check out the [Diffusion Course](https://huggingface.co/learn/diffusion-course/en/unit0/1). | |
| ## In this course | |
| In this course, each core unit will go over these three building blocks: | |
| 1. Multi-view diffusion, with a focus on tools and ecosystem | |
| 2. ML-friendly 3D, with a deep dive into Gaussian Splatting | |
| 3. Meshes, with a focus on practical applications | |
| Each of these units will also include a hands-on exercise, where you'll get to apply what you've learned in a real-world scenario. | |
| ### Introduction | |
| https://huggingface.co/learn/ml-for-3d-course/unit1/introduction.md | |
| # Introduction | |
| ## What is 3D? | |
| So what does 3D actually mean? | |
| Turns out, a lot of things. There are many different approaches to representing 3D, as well as directions it could go. | |
| In this unit, I'll talk about: | |
| 1. These different representations of 3D | |
| 2. How they fit together | |
| 3. Where things seem to be going | |
| Starting with, [meshes](meshes)! | |
| ### Meshes | |
| https://huggingface.co/learn/ml-for-3d-course/unit1/meshes.md | |
| # Meshes | |
| ## What's a mesh? | |
| A [mesh](https://en.wikipedia.org/wiki/Polygon_mesh) is a collection of vertices, edges, and faces that define a 3D object. | |
| This is how nearly all 3D is represented in real-world applications today. | |
|  | |
| ## The problem | |
| Meshes are difficult for machine learning models. | |
| Most 3D research today looks something like this: | |
| 1. A machine learning pipeline produces a non-mesh 3D representation | |
| 2. This non-mesh representation is converted to a mesh using [Marching Cubes](https://en.wikipedia.org/wiki/Marching_cubes) | |
| While progress has been very rapid in Step 1, Step 2 is relatively unchanged since the 1980s. This creates a gap between 3D research, which produces advancements in Step 1, and 3D applications, which rely on the final output of Step 2. | |
| This is a simplification, but it highlights the challenges in the 3D machine learning landscape broadly. | |
| ## The solution | |
| It remains to be seen whether Step 2 will be improved or if the 3D ecosystem will change entirely (or somewhere in between). | |
| In the meantime, it's useful to understand the building blocks of current 3D machine learning research, starting with [non-meshes](non-meshes). | |
| ### What's going on? | |
| https://huggingface.co/learn/ml-for-3d-course/unit0/whats-going-on.md | |
| # What's going on? | |
| ## Tipping point | |
| In recent years, there has been a tipping point in the domains of language and vision. New models are releasing constantly, such as the recent [Llama 3](https://huggingface.co/blog/llama3). | |
| These have become useful tools for a wide range of tasks. | |
| ## What about 3D? | |
| When it comes to 3D, we haven't quite reached this tipping point. | |
| However, we seem to be very close, with new research coming out constantly. | |
| While this is good, it can be very overwhelming to keep up with, especially since there's very little consistency in what 3D even means. | |
| ## What is 3D? | |
| New research usually presents 3D results as pre-rendered videos, even for high-quality models like [TripoSR](https://stability.ai/news/triposr-3d-generation). | |
| But how did they get this video? | |
| Is it a mesh? A splat? A NeRF? Multi-view diffusion? What do these things even mean? | |
| In this course, we'll be answering this question, painting a broader picture of the ecosystem as a whole. | |
| ### Welcome to the 🤗 Machine Learning for 3D Course [[introduction]] | |
| https://huggingface.co/learn/ml-for-3d-course/unit0/introduction.md | |
| # Welcome to the 🤗 Machine Learning for 3D Course [[introduction]] | |
| ## Sign up | |
| To receive updates as the course releases, sign up for the course mailing list [here](https://mailchi.mp/911880bcff7d/ml-for-3d-course). | |
| ## Overview | |
| In this course, you'll learn: | |
| 1. **What's going on** - the current big picture of machine learning for 3D | |
| 2. **Why it matters** - the importance of recent developments | |
| 3. **How to do it yourself** - build your own generative 3D demo | |
| ## Who am I? | |
| I'm [Dylan Ebert](https://twitter.com/dylan_ebert_), also known as [IndividualKex](https://www.youtube.com/@IndividualKex). I'm a developer advocate at Hugging Face focusing on 3D. I also create educational content related to various topics. | |
| This course is available here, on my [channel](https://www.youtube.com/@IndividualKex), and open source on [GitHub](https://github.com/huggingface/ml-for-3d-course). The content is presented redundantly as video, text, and code - whichever you prefer. | |
| ## Discord | |
| Join the [Hugging Face Discord](https://hf.co/join/discord) to ask questions, share your work, and connect with others (in the `#3d` channel). | |
| ### How to do it yourself | |
| https://huggingface.co/learn/ml-for-3d-course/unit0/how-to-do-it-yourself.md | |
| # How to do it yourself | |
| Before continuing with this course, there are some things that will be useful to be at least somewhat familiar with. | |
| ## Prerequisites | |
| 1. [Git](https://git-scm.com/) - the version control system used throughout this course | |
| 2. [Python](https://www.python.org/) - the programming language used throughout this course | |
| 3. [Blender](https://www.blender.org/) - used very briefly in the last unit. Knowledge of concepts like vertices, faces, and UVs will be useful, but not critical | |
| 4. [Hugging Face Hub](https://huggingface.co/) - used to download and share models and datasets | |
| If you aren't familiar with all of these, don't worry - you can still follow along. | |
| ## Wrapping up | |
| By the end of this course, you'll have: | |
| 1. A better understanding of ML for 3D | |
| 2. Have built your own generative 3D demo | |
| So let's get started! | |
| Don't forget to [join the Discord](https://hf.co/join/discord). | |
| ### Why does it matter? | |
| https://huggingface.co/learn/ml-for-3d-course/unit0/why-does-it-matter.md | |
| # Why does it matter? | |
| ## As a tool | |
| 3D is everywhere - from games, to movies, to retail. | |
| As we've seen with 2D, machine learning can be an extremely useful tool. | |
| This is likely already pretty obvious. | |
| ## For general intelligence | |
| Something that's less obvious is the importance of 3D for general intelligence. | |
| > In order to achieve general intelligence, AI needs to be grounded to the 3D world. | |
| It's a popular claim that we need 3D for the next big leap in AI. However, there is no consensus on _how_ 3D should be represented or what it looks like to _understand_ the 3D world. | |
| This remains to be seen and highlights the importance of research in this area. | |
| ## For you | |
| Whether you are: | |
| 1. An ML practitioner who wants to learn more about 3D | |
| 2. A 3D practitioner who wants to learn more about ML | |
| 3. You have no idea why you're here | |
| This is the course for you. | |
Xet Storage Details
- Size:
- 58 kB
- Xet hash:
- 38ff4db095657856753b6a1beab6672dccfbe0992088267a9e4dfe75b35c39a3
·
Xet efficiently stores files, intelligently splitting them into unique chunks and accelerating uploads and downloads. More info.